Saturday, 7 July 2012

Creating the Autocomplete in Android


Autocomplete:-  


If you want that as you type the TextField it provide suggestions , you can use AutocompleteTextView which is subclass of EditText. To implement auto-complete, we specify the Adapter that provide suggestion.There are several kind of adapter is available but depending upon the where is data come form either array or data base.


In this example. 


(1) There is a  TextView .
(2) A Autocomplete EditText.


LAYOUT OF THE PROGRAM

We make it by Graphical Method:By default in Graphical Method it show Icon and Text in pop down menu.We can can select Show only Icon.

By drag and drop you make easily layout of the program once you make, the main.xml file auto generated.


 <RelativeLayout
xmlns:android="http://schemas.android.com/apk/res/android"
    xmlns:tools="http://schemas.android.com/tools"
    android:layout_width="fill_parent"
    android:layout_height="fill_parent" >

    <TextView
        android:id="@+id/textView1"
        android:layout_width="wrap_content"
        android:layout_height="wrap_content"
        android:layout_alignParentLeft="true"
        android:layout_alignParentTop="true"
        android:text="@string/fav"
         />

    <AutoCompleteTextView
        android:id="@+id/autoCompleteTextView1"
        android:layout_width="wrap_content"
        android:layout_height="wrap_content"
        android:layout_alignRight="@+id/textView1"
        android:layout_below="@+id/textView1"
        android:layout_marginTop="18dp"
        android:ems="10"

         >

        <requestFocus />
    </AutoCompleteTextView>

</RelativeLayout>


Add item in array String fav_dish


After the adding item


Explanation:
Here is 
Hello, app_name,menu_settings and title_activity_main is default String
One is Text String that is entxt That will show inTextField when there is no text
One array  fav_dish
Six item is added 


package abh.example.autoexample;


import android.app.Activity;
import android.os.Bundle;
import android.widget.ArrayAdapter;
import android.widget.AutoCompleteTextView;


public class MainActivity extends Activity {


    @Override
    public void onCreate(Bundle savedInstanceState) {
        super.onCreate(savedInstanceState);
        setContentView(R.layout.activity_main);
        String[] dish = getResources().getStringArray(R.array.fav_dish);
        ArrayAdapter<String> ada =  new ArrayAdapter<String>(this, android.R.layout.simple_list_item_1, dish);
        
          AutoCompleteTextView tv = (AutoCompleteTextView)findViewById(R.id.autoCompleteTextView1);
                  tv.setAdapter(ada);
  
    }  
}


Expanation:-
 String[] dish = getResources().getStringArray(R.array.fav_dish)

Here we importing all xml item resources and storing them in dish array.R.array is  specific class that generate from the resources.R.array.itemname is the name of the field within the class which is know as static variable or static
    Now we are using Adapter. The purpose of an adapter is manage the data i.e. that hold all suggestion data and define the ID that is here is simple_list_item_1

ArrayAdapter<String> ada =  new ArrayAdapter<String>(this, android.R.layout.simple_list_item_1, dish);
        
 There is three parameter 
(1)this
(2)android.R.layout.simple_list_item_1
(3)dish

"this" the context class
 android.R.layout.simple_list_item_1.This layout define in Android There is number of inbuild android layout it will found Android SDK folder platform/<android-version>/data/res/layout
dish is array
The next final step is associate the Adapter with AutoCompleteTextView and setAdapter() method  with AutoCompleteTextView.


 Downlod apk file for this project

Wednesday, 20 June 2012

Creating Question and Answer with Checkbox

Checkbox:-  


Check boxes are used when you want to use want to select one or more option from a set of alternative 

Select the Item in Checkbox :-


In this example. 


(1) There four 11 Player,3 Umpire, 2 Umpire, 31 Ball and 1 Bat.


(2) There is only Two alternate is right i.e. 11 player and 2 Umpire.


(3)Whatever you choose the option it will show in the TextView.


(4)There is three  image Ques.png,valid.png,wrong.png.


(5)These images change according to the chooses question.


LAYOUT OF THE PROGRAM


We make it by Graphical Method:By default in Graphical Method it show Icon and Text in pop down menu.We can can select Show only Icon.


Graphical view


By drag and drop you make easily layout of the program once you make, the main.xml file auto generated.

<?xml version="1.0" encoding="utf-8"?>
<LinearLayout xmlns:android="http://schemas.android.com/apk/res/android"
    android:layout_width="fill_parent"
    android:layout_height="fill_parent"
    android:orientation="vertical"
>

    <TextView
        android:id="@+id/textView1"
        android:layout_width="wrap_content"
        android:layout_height="wrap_content"
        android:text="@string/ques"

         />

    <CheckBox
        android:id="@+id/op1id"
        android:layout_width="wrap_content"
        android:layout_height="wrap_content"
        android:text="@string/op1"
/>

    <CheckBox
        android:id="@+id/op2id"
        android:layout_width="wrap_content"
        android:layout_height="wrap_content"
        android:text="@string/op2" />

    <CheckBox
        android:id="@+id/op3id"
        android:layout_width="wrap_content"
        android:layout_height="wrap_content"
        android:text="@string/op3"
/>

    <CheckBox
        android:id="@+id/op4id"
        android:layout_width="wrap_content"
        android:layout_height="wrap_content"
        android:text="@string/op4"
/>


    <TextView
        android:id="@+id/anstextid"
        android:layout_width="wrap_content"
        android:layout_height="wrap_content"
        android:layout_gravity="center"
        android:text="@string/ans"

        />
   
    <ImageView
        android:id="@+id/image1"
        android:layout_width="wrap_content"
        android:layout_height="wrap_content"
        android:src="@drawable/ques"
        android:layout_gravity="center"
/>


    <Button
        android:id="@+id/refid"
        android:layout_width="wrap_content"
        android:layout_height="wrap_content"
        android:text="@string/ref" android:layout_gravity="center"
/>

</LinearLayout> 

String.xml
Android Resources(default)

Explanation:
Here is 
Hello and app_name is default String
One is Text String that is ques
Four Check box Label
One is "Your Answer" String resources where ans shows
One Refresh Button Label


Now the Java Source Code


Java Source Code:-


package abh.checkbox.com;


import android.app.Activity;
import android.content.Context;
import android.os.Bundle;
import android.view.View;
import android.widget.*;

public class CheckboxquestionActivity extends Activity implements CompoundButton.OnCheckedChangeListener  {
    /** Called when the activity is first created. */
    CheckBox opt1,opt2,opt3,opt4;
    TextView tv;
    ImageView iv;
    Button refbut;
    String str="";
    int flag1=0,flag2=0,flag3=0,flag4=0;
   
    static int num=0;
   
    @Override
    public void onCreate(Bundle savedInstanceState) {
        super.onCreate(savedInstanceState);
        setContentView(R.layout.main);
        opt1=(CheckBox)findViewById(R.id.op1id);
        opt2=(CheckBox)findViewById(R.id.op2id);
        opt3=(CheckBox)findViewById(R.id.op3id);
        opt4=(CheckBox)findViewById(R.id.op4id);
        tv = (TextView)findViewById(R.id.anstextid);
        iv=(ImageView) findViewById(R.id.image1);
        refbut=(Button)findViewById(R.id.refid);


        opt1.setOnCheckedChangeListener(this);
        opt2.setOnCheckedChangeListener(this);
        opt3.setOnCheckedChangeListener(this);
        opt4.setOnCheckedChangeListener(this);
       
        refbut.setOnClickListener(new View.OnClickListener() {
            public void onClick(View v) {
                // Perform action on click
                str="";
                tv.setText(str);
                iv.setImageResource(R.drawable.ques);
                opt1.setChecked(false);
                opt2.setChecked(false);
                opt3.setChecked(false);
                opt4.setChecked(false);
               
            }
        });


    }
   

    public void onCheckedChanged(CompoundButton buttonView, boolean isChecked) {
       
       
        if(opt1.isChecked() && flag1==0 )
        {
             str=str+opt1.getText();
             tv.setText(str);
             iv.setImageResource(R.drawable.valid);
             flag1=1;
             num++;
              
        }
        if(opt2.isChecked() && flag2==0)
        {
            str=str+opt2.getText();
             tv.setText(str);
             iv.setImageResource(R.drawable.wrong);
             flag2=1;
             num++;
        }
        if(opt3.isChecked() && flag3==0)
        {
             str=str+opt3.getText();
             tv.setText(str);
             iv.setImageResource(R.drawable.valid);
             flag3=1;
             num++;
        }
        if(opt4.isChecked() && flag4==0)
        {
             str=str+opt2.getText();
             tv.setText(str);
             iv.setImageResource(R.drawable.wrong);
             flag4=1;
             num++;
        }
        if(num<2)
        {
            Context context = getApplicationContext();

            Toast toast = Toast.makeText(context, "Please Choose Two option", Toast.LENGTH_SHORT);
            toast.show();
        }
       
        }
   
       
    }


Expanation:- 
We define  OnCheckedChangeListener but we need to wire it to UI element before it come to action.There is two line of code that connect to checkbox to listen the checkbox click event
(1) Declaration of checkbox in main.xml file


  <CheckBox
        android:id="@+id/op1id"
        android:layout_width="wrap_content"
        android:layout_height="wrap_content"
        android:text="@string/op1"
/>

    <CheckBox
        android:id="@+id/op2id"
        android:layout_width="wrap_content"
        android:layout_height="wrap_content"
        android:text="@string/op2" />

    <CheckBox
        android:id="@+id/op3id"
        android:layout_width="wrap_content"
        android:layout_height="wrap_content"
        android:text="@string/op3"
/>

    <CheckBox
        android:id="@+id/op4id"
        android:layout_width="wrap_content"
        android:layout_height="wrap_content"
        android:text="@string/op4"
/>


(2)  opt1,opt2,opt3,opt4 is checkbox variable is connected to setOnCheckedChangeListener(this) by two line of code for each checkbox


         opt1=(CheckBox)findViewById(R.id.op1id);
        opt2=(CheckBox)findViewById(R.id.op2id);
        opt3=(CheckBox)findViewById(R.id.op3id);
        opt4=(CheckBox)findViewById(R.id.op4id);


opt1.setOnCheckedChangeListener(this);
        opt2.setOnCheckedChangeListener(this);
        opt3.setOnCheckedChangeListener(this);
        opt4.setOnCheckedChangeListener(this)


public void onCheckedChanged(CompoundButton buttonView, boolean isChecked)
 It is method which takes two parameter CompoundButton and boolean.  checkedId is Id of the checkbox which is clicked.


      Every Activity class is subclass of Context Class.Generally Toast is used for the debugging purpose the  Toast is class generally used to show the message in the screen it takes three arguments Context reference, mmessage to display and the Toast.LENGTH_SHORT. 


Context context = getApplicationContext();

            Toast toast = Toast.makeText(context, "Please Choose Two option", Toast.LENGTH_SHORT);
            toast.show();


toast.show() function is the function which is used to display the message.

Saturday, 16 June 2012

Creating CheckBox in Android


Checkbox:-  

Check boxes are used when you want to use want to select one or more option from a set of alternative if only one option is to be selected at a time then you must select RadioButton

Select the Item in Checkbox :- 


In this example. There four checkbox Tea,Snecks,Coffee,Pakodas
Whatever you choose the checkbox value is show in TextView.
Layout of program:-
Layout of Checkbox


 We make it by Graphical Method:By default in Graphical Method it show Icon and Text in pop down menu.We can can select Show only Icon.

Graphical Design of Checkbox problem
Graphical and Properties view
 When you select the view in Graphical its prproperties is shown in Right Pan of eclipse. if it is not show you can Window->show View->properties. you can choose the value of properties.

By drag and drop you make easily layout once you make the main.xml file auto generated
<?xml version="1.0" encoding="utf-8"?>
<LinearLayout xmlns:android="http://schemas.android.com/apk/res/android"
    android:layout_width="fill_parent"
    android:layout_height="fill_parent"
    android:orientation="vertical" >

    <TextView
        android:id="@+id/checkboxid"
        android:layout_width="wrap_content"
        android:layout_height="wrap_content"
        android:text="@string/example"
        android:textColor="@color/green"
        android:textSize="32dp"
/>

    <CheckBox
        android:id="@+id/teaid"
        android:layout_width="wrap_content"
        android:layout_height="wrap_content"
        android:text="@string/t"
        android:textColor="@color/col2"
/>

    <CheckBox
        android:id="@+id/sneckid"
        android:layout_width="wrap_content"
        android:layout_height="wrap_content"
        android:text="@string/s"
        android:textColor="@color/col3"
/>

    <CheckBox
        android:id="@+id/coffeeid"
        android:layout_width="wrap_content"
        android:layout_height="wrap_content"
        android:text="@string/c"
        android:textColor="@color/col4"
/>

    <CheckBox
        android:id="@+id/pakodasid"
        android:layout_width="wrap_content"
        android:layout_height="wrap_content"
        android:text="@string/p"
        android:textColor="@color/col5"
/>
    <TextView
        android:id="@+id/textView1"
        android:layout_width="112dp"
        android:layout_height="wrap_content"
        android:layout_gravity="center"
        android:textSize="16dp"
        android:text="@string/distxt"
/>
</LinearLayout>

String.xml
Android Resources(default)


Explanation:
Here is 
Hello and app_name is default String
Four checkbox label
Five  color label
One Label Example String
One TextView


  Now the Java Source Code

Java Source Code:-


package abh.checkbutton.com;


import android.app.Activity;
import android.os.Bundle;
import android.widget.*;

public class CheckbuttonexampleActivity extends Activity implements CompoundButton.OnCheckedChangeListener  {
    /** Called when the activity is first created. */
    CheckBox  te,sn,cof,pak;
    TextView tv;
  
    @Override
    public void onCreate(Bundle savedInstanceState) {
        super.onCreate(savedInstanceState);
      
      
        setContentView(R.layout.main);
        te=(CheckBox) findViewById(R.id.teaid);
        sn=(CheckBox) findViewById(R.id.sneckid);
        cof=(CheckBox) findViewById(R.id.coffeeid);
        pak=(CheckBox) findViewById(R.id.pakodasid);
        tv=(TextView) findViewById(R.id.textView1);
        te.setOnCheckedChangeListener(this);
        sn.setOnCheckedChangeListener(this);
        cof.setOnCheckedChangeListener(this);
        pak.setOnCheckedChangeListener(this);
      
    }

    public void onCheckedChanged(CompoundButton buttonView, boolean isChecked) {
        String str=" ";
        if(te.isChecked())
        {
            str=str+te.getText();
            tv.setText(str);
          
        }
        if(sn.isChecked())
        {
            str=str+","+sn.getText();
            tv.setText(str);
        }
        if(cof.isChecked())
        {
            str=str+","+cof.getText();
            tv.setText(str);
        }
        if(pak.isChecked())
        {
            str=str+","+pak.getText();
            tv.setText(str);
        }
    }
  

}


Expanation:- 
We define  OnCheckedChangeListener but we need to wire it to UI element before it come to action.There is two line of code that connect to checkbox to listen the checkbox click event
(1) Declaration of checkbox in main.xml file
 

  <CheckBox
        android:id="@+id/teaid"
        android:layout_width="wrap_content"
        android:layout_height="wrap_content"
        android:text="@string/t"
        android:textColor="@color/col2"
/>

    <CheckBox
        android:id="@+id/sneckid"
        android:layout_width="wrap_content"
        android:layout_height="wrap_content"
        android:text="@string/s"
        android:textColor="@color/col3"
/>

    <CheckBox
        android:id="@+id/coffeeid"
        android:layout_width="wrap_content"
        android:layout_height="wrap_content"
        android:text="@string/c"
        android:textColor="@color/col4"
/>

    <CheckBox
        android:id="@+id/pakodasid"
        android:layout_width="wrap_content"
        android:layout_height="wrap_content"
        android:text="@string/p"
        android:textColor="@color/col5"
/>
   

(2)  te,sn,cof,pak,tv,te,te,sn,cof,pak is checkbox variable is connected to setOnCheckedChangeListener(this) by two line of code for each checkbox

        te=(CheckBox) findViewById(R.id.teaid);
        sn=(CheckBox) findViewById(R.id.sneckid);
        cof=(CheckBox) findViewById(R.id.coffeeid);
        pak=(CheckBox) findViewById(R.id.pakodasid);
        tv=(TextView) findViewById(R.id.textView1); 

        te.setOnCheckedChangeListener(this);
        sn.setOnCheckedChangeListener(this);
        cof.setOnCheckedChangeListener(this);
        pak.setOnCheckedChangeListener(this);

public void onCheckedChanged(CompoundButton buttonView, boolean isChecked)
 It is method which takes two parameter CompoundButton and boolean.  checkedId is Id of the checkbox which is clicked.
tv.setText(str):-By this method you can set the value of checkbox in TextView.

Thursday, 14 June 2012

Creating Radio Button in Android

RadioButton:-  

RadioButton is user interface tool kit. A RadioButton give several choice to user but strict to only one selection.RadioButton is generally belong to a group i.e RadioGroup and each group forced to user select one RadioButton.

Change the Image on Click of Radiobutton:- 


It is example of change the image on click of RadioButton.In this example.when application start  There is initially a white rectangular image in center.
if you click the Red radiobutton the image change to Red rectangular image.
if you click the Blue radiobutton the image change to Blue rect image.
if you click the Green radiobutton the image change to Green rect image.

Layout of Radiobutton Example


 There is should be
(1)A TextView
(2)Three Radiobutton
(3)A Rectangular Image 50*50  
 

Graphic Method


 We make it by Graphical Method:By default in Graphical Method it show Icon and Text in pop down menu.We can can select Show only Icon.


By drag and drop you make easily layout once you make the main.xml file autogenerated

<?xml version="1.0" encoding="utf-8"?>
<LinearLayout xmlns:android="http://schemas.android.com/apk/res/android"
    android:layout_width="fill_parent"
    android:layout_height="fill_parent"
    android:orientation="vertical" >

    <TextView
        android:id="@+id/textView1"
        android:layout_width="wrap_content"
        android:layout_height="wrap_content"

        android:text="@string/rc" />

    <RadioGroup
        android:id="@+id/radioGroup1"
        android:layout_width="wrap_content"
        android:layout_height="wrap_content"
>

        <RadioButton
            android:id="@+id/radio0"
            android:layout_width="wrap_content"
            android:layout_height="wrap_content"
            android:checked="true"

            android:text="@string/col1" />              

        <RadioButton
            android:id="@+id/radio1"
            android:layout_width="wrap_content"
            android:layout_height="wrap_content"

            android:text="@string/col2"  />

        <RadioButton
            android:id="@+id/radio2"
            android:layout_width="wrap_content"
            android:layout_height="wrap_content"

            android:text="@string/col3" 
            />
    </RadioGroup>

    <ImageView

        android:id="@+id/imageView1"
        android:layout_width="wrap_content"
        android:layout_height="wrap_content"
        android:src="@drawable/rect"
        android:layout_gravity="center"
/>

</LinearLayout>
strings.xml file


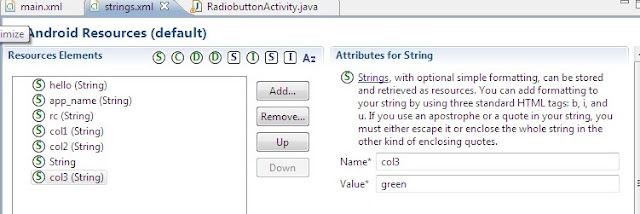
 Explanation: Here is Three color label We are using and these label is string resources and they should be define in strings.xml.

               This  is another alternate method for define the string resources just click  Add.. button  in the Right Pan and Create a new element at the top Level in Resources dialoge box will be open.just click the String label


 Android Resource default screen open and name of the variable and value of col which show in label in Radiobutton.There is three radio label and one a TextView String.
 if you see carefully there is five image in
 /res/drawable


blue.png
green.png
ic_launcher.png(default image or icon)
rect.png
red.png

blue.png,green.png,red.png,rect.png These all image is 50*50 pixel  you can make by Firework.you have to mention rect.png image in main.xml file by

android:src="@drawable/rect"  in  <ImageView 

you must notice one thing that there is no extension is mention rect image name In android there is no distinguish between the image format


rect is our initial image it shown whenever  android application run.

 Now the Java Source Code

Java Source Code:-

package abh.example.radio;
import android.app.Activity;
import
android.os.Bundle;
import
android.widget.ImageView;
import
android.widget.RadioButton;
import
android.widget.RadioGroup;


public class RadiobuttonActivity extends Activity implements RadioGroup.OnCheckedChangeListener
{
    RadioGroup rg;
    RadioButton r1,r2,r3;
    ImageView   iv;

    public void onCreate(Bundle savedInstanceState) {

        super.onCreate(savedInstanceState);
        setContentView(R.layout.main);
     // This will get the radiogroup

 
         rg=(RadioGroup)findViewById(R.id.radioGroup1);
         rg.setOnCheckedChangeListener(this);
        iv=(ImageView)findViewById(R.id.imageView1);
     
        //This will get the radiobutton

 
        r1=(RadioButton)findViewById(R.id.radio0);
        r2=(RadioButton)findViewById(R.id.radio1);
        r3=(RadioButton)findViewById(R.id.radio2);
       
    }     
           
            public void onCheckedChanged(RadioGroup rg, int checkedId)
            {               
                switch (checkedId)
                {
                case R.id.radio0:                   
                      iv.setImageResource(R.drawable.red);
                      break;                 
                case R.id.radio1:
                      iv.setImageResource(R.drawable.blue);
                      break;                 
                case R.id.radio2:
                      iv.setImageResource(R.drawable.green);
                  break;
              
                }
            }
}
          

Expanation:- 
We define  OnCheckedChangeListener but we need to wire it to UI element before it come to action.There is two line of code that connect to RadioButton to listen the RadioButton click event
(1) Declaration of RadioGroup in main.xml file
 

    <RadioGroup
        android:id="@+id/radioGroup1"
        android:layout_width="wrap_content"
        android:layout_height="wrap_content"
>


(2)  rg is RadioGroup variable is connected to setOnCheckedChangeListener(this) by two line of code

rg=(RadioGroup)findViewById(R.id.radioGroup1);
setOnCheckedChangeListener(this)
public void onCheckedChanged(RadioGroup rg, int checkedId)
 It is method which takes two parameter RadioGroup and checkedId. RadioGroup tell that which radiobutton is attached the radiogroup and checkedId is Id of the RadioButton which is clicked.
iv.setImageResource(R.drawable.red):-By this method you can change the image with same ImageView variable you need to just change the id of image.
------------------------------------*---------------------------------------------------------